
Globe City Zoning Code
APPENDICES
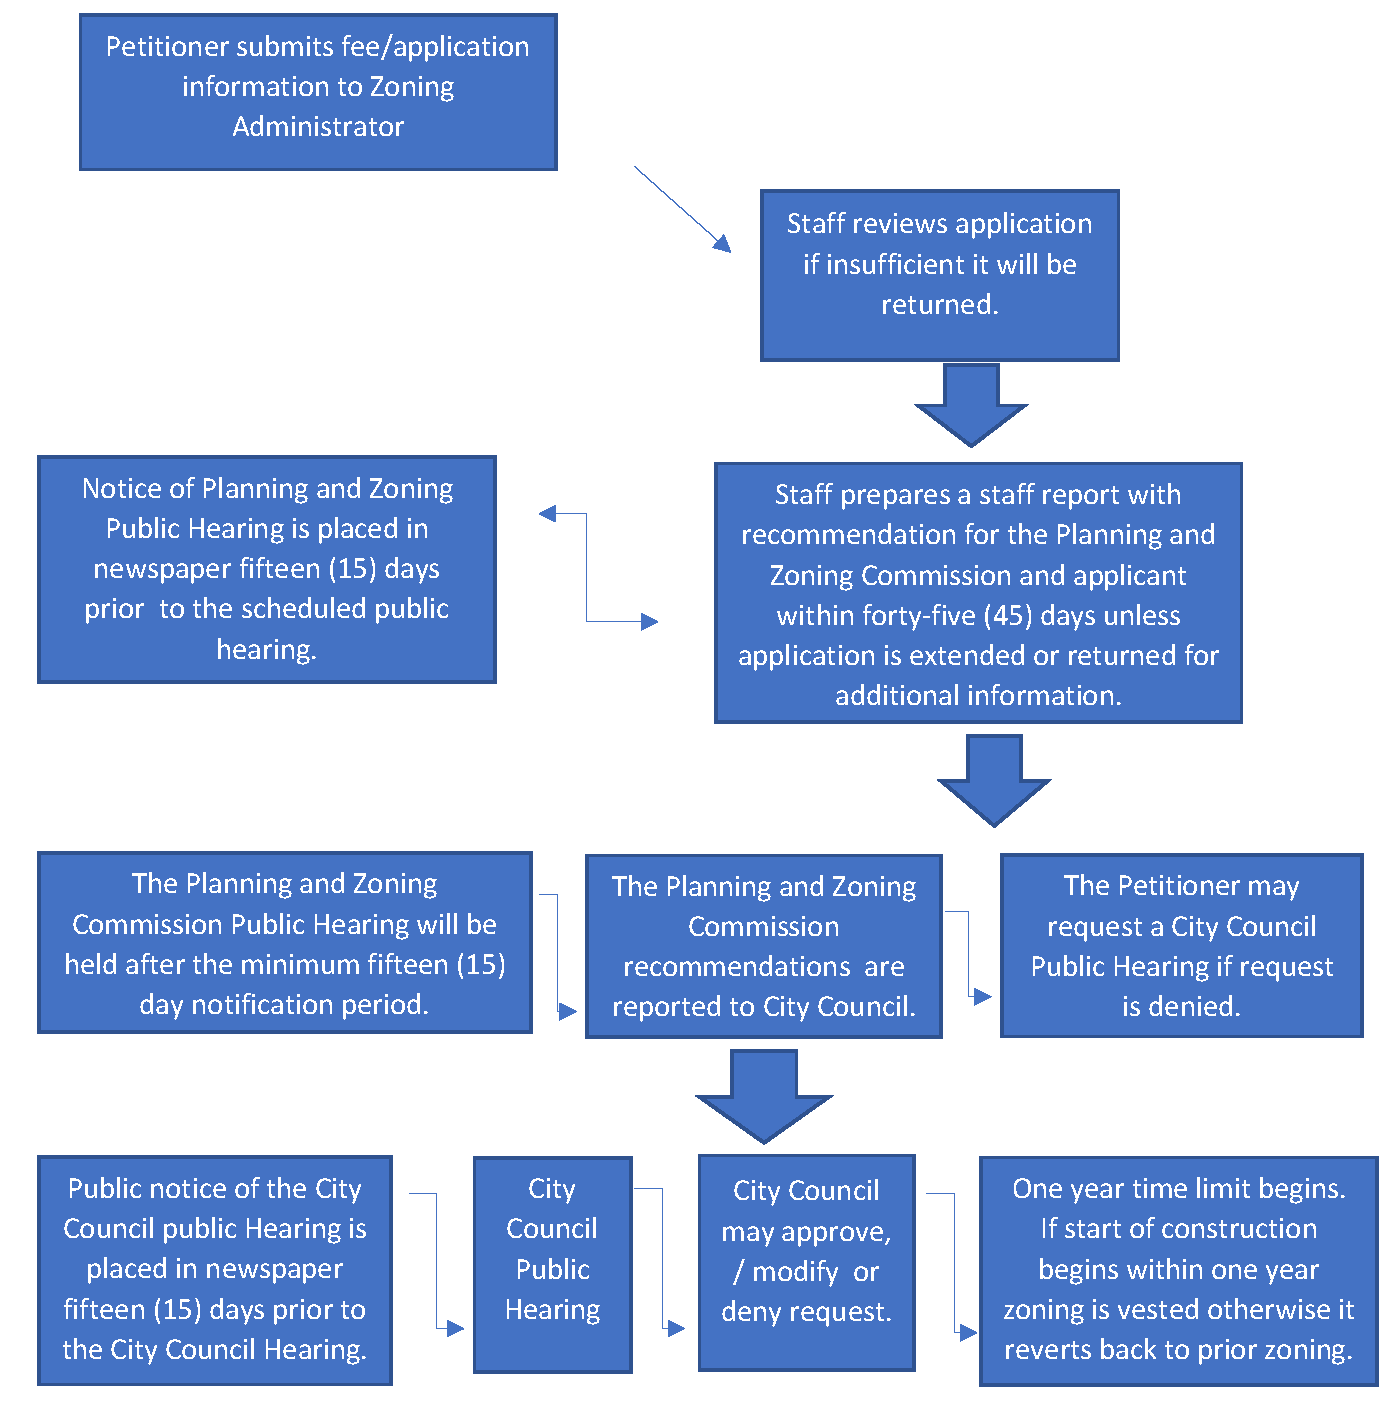
Appendix 1. - Zoning ordinance text amendment process.
An amendment to the zoning ordinance will have an effect on all properties in the City. Depending upon the amendment, it may change the required lot sizes, set-back requirements, uses permitted, or other regulations in a particular zone. A petition for an amendment to the ordinance may be filed in accordance with Section 14-9-1 of this chapter.

(Res. No. 1791, Exh. A, 11-27-2018; Ord. No. 855, § 1, 11-27-2018)
Appendix 2. - Rezoning process.
A rezoning of property which will change the uses permitted on said property may be filed in accordance with Section 14-9-1. The decision by the City Planning and Zoning Commission and City Council to approve or deny a zoning change request shall be based upon the uses within that area or surrounding area and the compatibility of the potential change with the general plan adopted by the City.
(Res. No. 1791, Exh. A, 11-27-2018; Ord. No. 855, § 1, 11-27-2018)
Appendix 3. - Variance process.
Variances can only be dimensional in nature (setbacks, height, size, etc.). Variances cannot be granted for uses not permitted in the zoning district in question. The burden of proof rests with the applicant who must prove a hardship by showing that to adhere to the established law he or she would be deprived of any reasonable lawful use of the property. See Section 14-9-4.

(Res. No. 1791, Exh. A, 11-27-2018; Ord. No. 855, § 1, 11-27-2018)
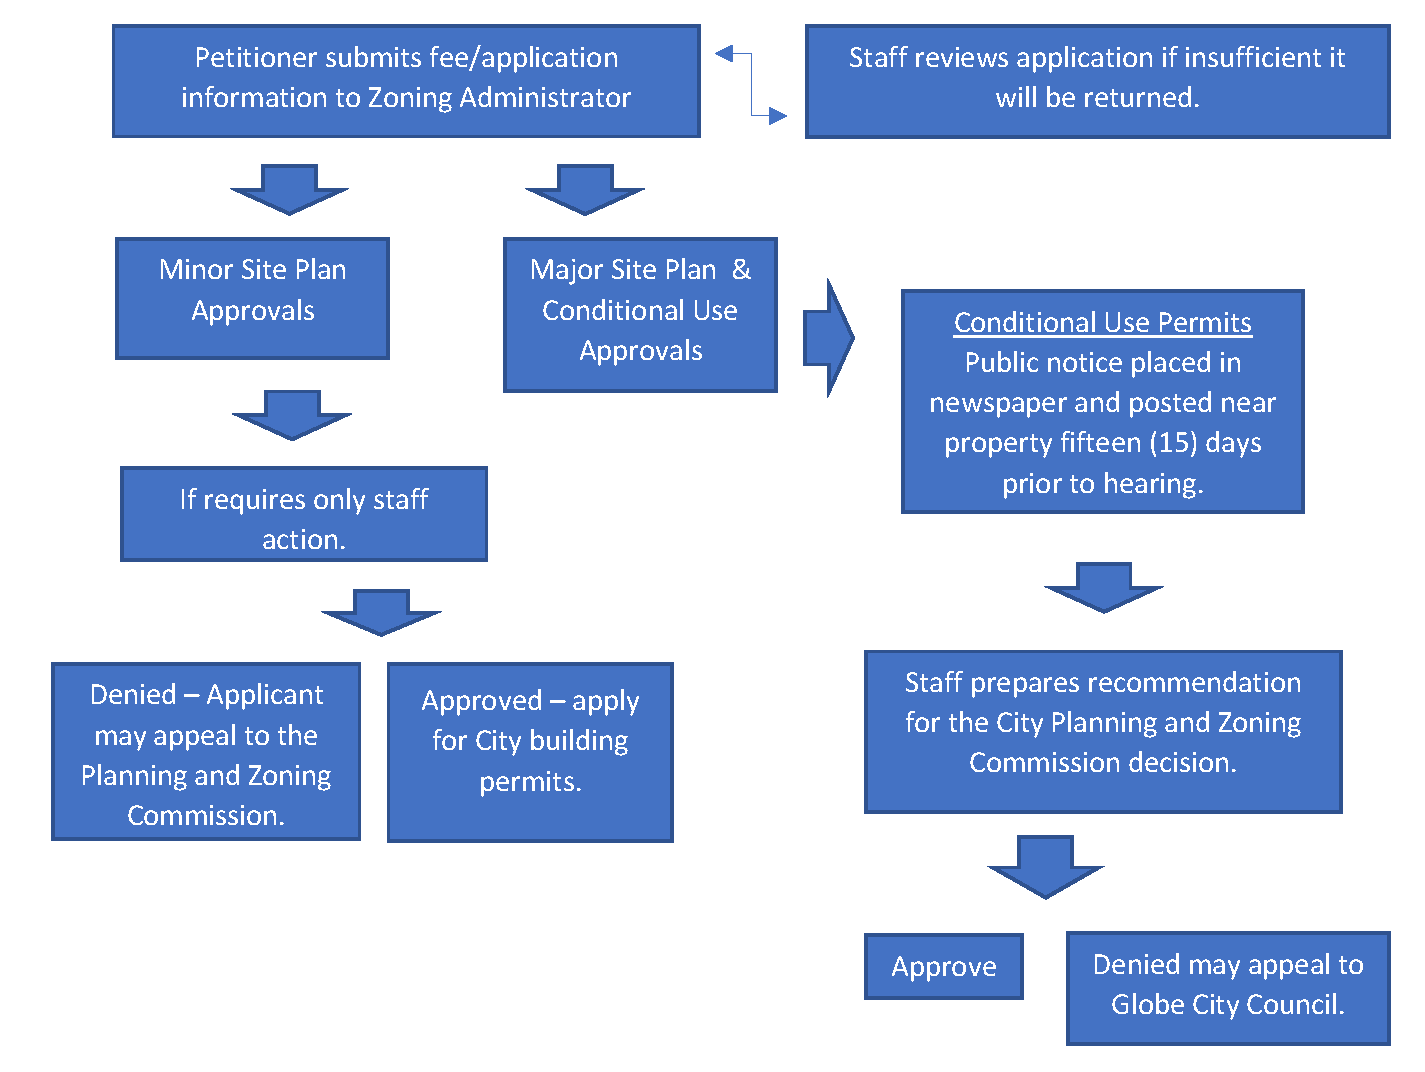
Appendix 4. - Site plan and conditional use process.
All proposals for development, with the exception of single and two family dwelling units, must be approved through the site plan review process. The main purpose of this site plan review process is to coordinate a complete review of any proposed development with the utility companies and various City departments to ensure that development plans are in full compliance with development regulations and community policies before construction begins. See Section 14-9-5.
Conditional uses are those uses which are allowed only if certain conditions are attached to the approval. All conditional uses are specifically listed within each category of the zoning ordinance. Conditional uses are processed in the same manner as site plans however, require Planning and Zoning Commission approval with exception to marijuana establishments. See Section 14-9-6.
(Res. No. 1791, Exh. A, 11-27-2018; Ord. No. 855, § 1, 11-27-2018)
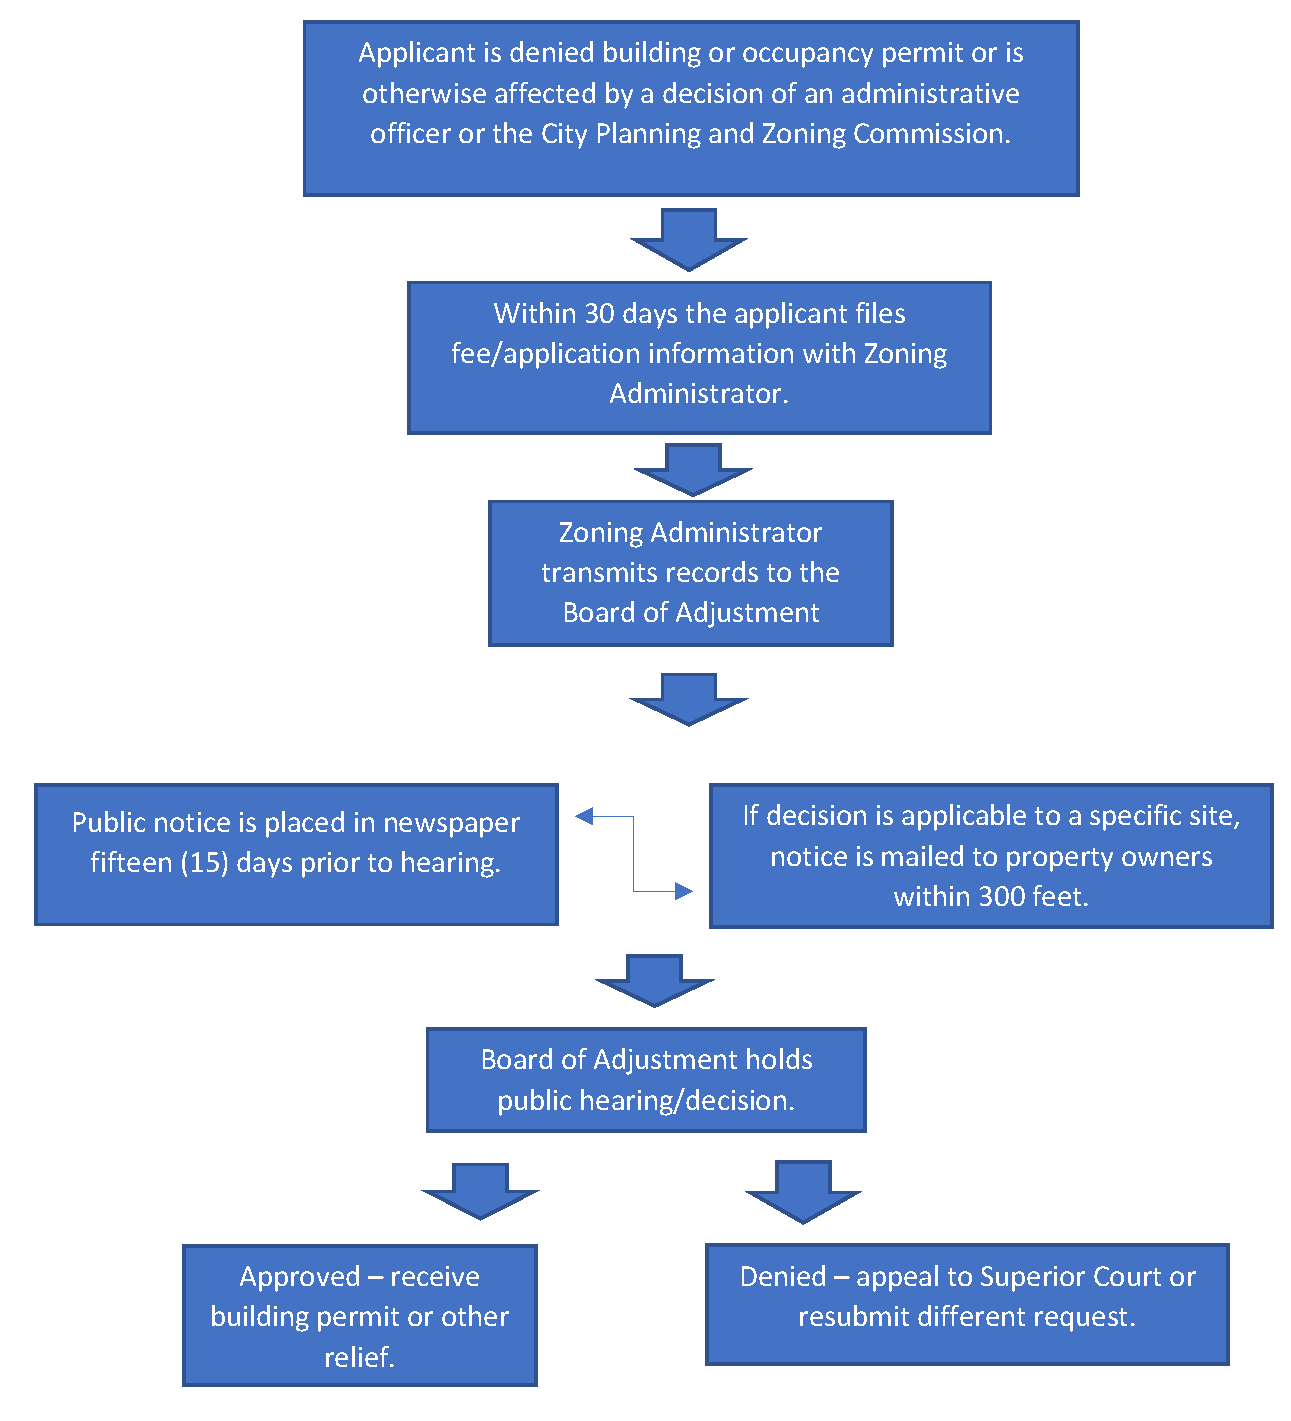
Appendix 5. - Administrative appeal process.
Any person who feels they have been aggrieved by a decision of the City's administrative personnel or the City Planning and Zoning Commission may file an appeal with the Board of Adjustment. In its capacity as an appeals board, the Board of Adjustment acts as a quasi-judicial body. See Section 14-9-7.
(Res. No. 1791, Exh. A, 11-27-2018; Ord. No. 855, § 1, 11-27-2018)
Appendix 6. - HP design guidelines.
Printed herein is the Historic Preservation Design Guidelines, Resolution No. 1313, as adopted by the City of Globe on April 17, 2000. Amendments to the ordinance are indicated by parenthetical history notes following amended provisions. The absence of a history note indicates that the provision remains unchanged from the original ordinance. Obvious misspellings and punctuation errors have been corrected without notation. For stylistic purposes, headings and catchlines have been made uniform and the same system of capitalization, citation to state statutes, and expression of numbers in text as appears in the Code of Ordinances has been used. Additions made for clarity are indicated by brackets.
CHAPTER 1. Introduction
A.
Architectural Styles
B.
Existing Character of Downtown
C.
Benefits of Rehabilitation
D.
Choosing a Rehabilitation Approach
E.
Project Planning
F.
Evaluating Facade Condition
CHAPTER 2. Special Design Guidelines for Historic Buildings
A.
Building Style
B.
Changes in Use
C.
Repairing and/or Replacing Original Features
D.
Existing Alterations
CHAPTER 3. Rehabilitation Guidelines for all Existing Buildings
A.
Typical Building Front Features
B.
Storefront Openings
C.
Facade Alignment
D.
Entrances
E.
Kickplates
F.
Doors
G.
Transoms
H.
Upper Windows
I.
Awnings
J.
Ornamental Details
K.
Facade Materials
L.
Roofs
M.
Additions
N.
"Plain Front" Buildings
O.
Rear Entrances
P.
Illumination
CHAPTER 4. Signs
A.
Buildings as Signs
B.
Sign Types
C.
Inappropriate Signs
D.
Sign Location
E.
Sign Material
F.
Sign Illumination
CHAPTER 5. Design Guidelines for Color
A.
Relating to Adjacent Color Schemes
B.
Coordinating the Entire Facade
C.
Using Accent Colors
CHAPTER 6. Design Guidelines for New Buildings
A.
Building Orientation
B.
Building Form and Scale
C.
Materials
D.
Entrances and Windows
E.
Porches, Awnings and Balconies
CHAPTER 7. Site Design Guidelines
A.
Building Setbacks
B.
Plant Beds and Planting
C.
Parking Lots and Landscaping
D.
Service Areas and Equipment
CHAPTER 8. Maintenance Tips
A.
Upper Story Windows
B.
Storefronts
C.
Roofs
D.
Awnings and Canopies
E.
Signs
F.
Energy Conservation
G.
Technical Issues
CHAPTER 9. Appendix
A.
Glossary of Architectural Terms
FOREWORD
Background.
This document was developed to provide a current set of design guidelines to be used by the City of Globe Historic Preservation Advisory Commission and others involved in the design, review, and construction of development projects in designated Historic Preservation District(s) within the City of Globe. The intent of the Commission is to adopt and utilize these guidelines.
Ordinance No. 593 was adopted by the Globe City Council on June 2 nd , 1986 (becoming effective July 2 nd , 1986) to establish historic preservation as a goal in the City of Globe, and to qualify the City for the Certified Local Government (CLG) Program administered by the State of Arizona. The intent of the CLG Program is to preserve the historic and architectural heritage of designated areas of cities and towns, by setting up a review process for projects in these designated areas which would impact the district, including new buildings, changes to existing building exteriors, facade changed, signage, lighting, parking, landscaping and demolition.
How the Commission will Use the Guidelines.
This handbook was designed to be read and used as a whole, but the individual chapters can be used independently for projects of limited scope. The guidelines within the handbook will be used by the Commission to assist property owners and developers in the preservation, renovation, rehabilitation, and reuse of historic structures and others within designated (historic design review) districts. The Commission shall review and make decisions on any development application for a certificate of appropriateness and require the same plans submitted for the City Planning and Zoning Commission, plus applicable elevation drawings. A certificate of appropriateness is simply a certificate of approval issued by the Commission once a project is reviewed and approved.
The Procedure for Having a Project Approved is as Follows:
•
Prior to any exterior alteration, restoration, reconstruction, removal, or demolition of any building, or new construction of a non-historic structure within a designated design review district (maps available at City Hall), or any material change in the exterior appearance of such property, its signs, light fixtures, fences, steps, sidewalks, paving, landscaping, paint or other exterior elements visible from a public street or alley which affects the appearance and cohesiveness of the district, plans for the proposed project must be submitted to the City of Globe's Historic Preservation Advisory Commission. This submittal must include all information required by the application and any other information deemed necessary by the Commission to review a project properly.
•
The Commission will review the project and determine whether or not the project is appropriate for the district. If the project is approved, the Commission will issue a certificate of appropriateness and the applicant may then apply for any necessary construction permits for the project.
Although this procedure is expected to cause a minor increase in the review time for projects in the designated historic districts (21 days maximum anticipated), it should be remembered that the Commission exists to work with property owners and developers to assure that projects within Globe's designated historic districts conform to and enhance the existing architectural character which is so important to our community.
This handbook is included as a guide to the Commission in making consistent decisions on the appropriateness of proposed changes. Interpretation should be neither overly strict nor too permissive. In making its decision, the Commission will consider the historic value of the building, its prominence and significance to the district, the state of physical deterioration, and the economic factors of repair, replacement, or renovation.
CREDITS
Inquiries about the handbook should be addressed to:
Historic Globe Main Street, P O Box 662, Globe, AZ 85502 (520) 425-9340
OR
City of Globe Historic Preservation Advisory Commission, 150 N Pine Street, Globe,
AZ 86001 520-779-7632
SUMMARY OF DESIGN GUIDELINES
The historic preservation ordinance is designed to preserve and enhance the historic district. This ordinance requires a certificate of appropriateness be granted before any changes are made to the exterior appearance of properties within a designated historic district. The Historic Preservation Commission recommends that the following proposed design guidelines serve as the criteria for approval. For more information on each guideline, refer to the appropriate chapter.
CHAPTER 1
INTRODUCTION
A.
ARCHITECTURAL STYLES.
Downtown Globe contains a rich variety of building styles. Victorian Vernacular, Georgian Revival, Gothic Revival, Spanish Colonial Revival, Romanesque Revival, Vernacular Commercial, Neoclassical, Art Deco, and Beaux-Arts Classicism are a few of the styles of architecture to be noted and preserved.
B.
EXISTING CHARACTER OF DOWNTOWN.
Downtown contains a rich collection of historic buildings that chronicle the history of the community. They provide visual interest as well and help to establish a background for conducting healthy business. The area appeals to local residents and visitors because of the variety of architecture and the interesting pedestrian experience that is found there. Although built over many decades, most buildings downtown share common characteristics that help to establish a sense of continuity on the street.
These features should be respected and even enhanced. The alignment of storefronts at the sidewalk edge is one example of an element that many buildings have in common. The large expanse of glass at the street level of most buildings is another.
C.
BENEFITS OF REHABILITATION.
Rehabilitation and a good design will extend the life of your building's front, reduce long-term maintenance costs, improve the market image of the businesses housed inside, and enhance the overall character of downtown. Consciously or unconsciously, people react to the visual quality of their environment, and downtown, where a primary function is commerce, buildings and storefront windows constantly provide clues about the character of the businesses found there.
D.
CHOOSING A REHABILITATION APPROACH.
Establish a general approach before getting into details. Stop a moment and decide on an overall approach for your building improvements. The primary objectives of a rehabilitation plan should be:
•
To preserve important or "character-defining" architectural materials and features of the building; and
•
To provide for a safe and efficient modern use in the building; and
•
To develop a cost effective design.
Determine the contents of your rehabilitation plan. The plan should contain strategies for these three types of repair work:
•
Protection and maintenance of building features that survive in generally good condition.
•
Repair of materials and features that are in a deteriorated condition.
•
Replacement of materials and features with new materials where deterioration is so extensive that repair is not possible.
Your plan may also include strategies for:
•
Alterations to the exterior of the historic building.
•
Additions of new rooms or spaces to the exterior of the historic building.
E.
PROJECT PLANNING.
STEP 1.
CHECK WITH THE HISTORIC GLOBE MAIN STREET PROGRAM FOR ADVICE.
Main Street has a collection of historic photos of many downtown buildings, as does the Gila County Historical Museum. Main Street will also be able to determine whether or not a building and/or project may qualify for grant funding.
STEP 2.
CHECK FOR CRITICAL MAINTENANCE OR SAFETY ISSUES.
If the roof leaks, if floors are sagging, repairs to the structure or weather-protective systems may be a priority before facade renovation.
STEP 3.
EVALUATE THE CONDITION OF THE BUILDING FRONT.
Does the original design survive intact? If so, preservation and maintenance of the existing design should be your overall approach.
Does the original design survive, but with some alterations? If so, restoration of the original combined with new compatible alterations should be your overall approach.
Is the facade significantly altered or totally lacking detail? If so, you may have two options: One is to reconstruct the original design, if it has merits. The second option is to develop a totally new design that fits in with the character of downtown. These conditions are defined on page 13.
STEP 4.
CONSIDER HOW THE DESIGN OF YOUR BUILDING FRONT AFFECTS THE VALUE OF THE PROPERTY AS A PLACE TO DO BUSINESS.
A well-designed building front is an asset to the property owner and to building occupants. You should plan a building rehabilitation that will present the best image to the street to enhance marketing.
STEP 5.
IDENTIFY WHICH CITY CODES AND ORDINANCES MAY APPLY.
Include a review of the Historic Preservation Ordinance as well as the Sign Code in your Code review.
STEP 6.
DETERMINE WHO WILL BE RESPONSIBLE FOR IMPROVEMENTS.
Building owners are usually responsible for improvements to the building itself. These often include repairs to cornices, cleaning of masonry, painting or remodeling of store windows and entrances. Each situation is different, however, and specific responsibilities are often negotiated on an individual basis between tenant and owner.
STEP 7.
DETERMINE WHO WILL BE RESPONSIBLE FOR ONGOING MAINTENANCE.
In many cases, the business tenant is responsible for maintenance of signs. They may also be responsible for maintenance of fabric awnings; building owners are usually responsible for maintenance of metal canopies and for directory signs that are shared by several businesses.
STEP 8.
PLAN YOUR PROJECT TO BE IMPLEMENTED IN PHASES.
Some projects require implementation in stages, to meet budgets and business plans. If you must phase your rehabilitation, plan the work so each step builds on the previous ones, and undoing of recent work is minimized. For example, start with a simple fix-up scheme that can later be incorporated in a more major rehab. Here's an example of one building owner's rehab schedule:
Phase 1.
First Year:
Execute maintenance and repairs that stabilize the building from water intrusion, such as [patching] the roof and repairing downspouts. Washing the building front and replacing broken glass and lights might also be included.
Phase 2.
Later in the First Year:
Continue with a fresh paint scheme, install an awning, and a new sign. Design the sign so it can be removed and remounted during later stages. Install color-matching window shades in upper windows. (See the Section of Rehab Tips for specific design ideas.)
Phase 3.
Second Year:
Follow up later with a new door, restore the cornice, and reopen the transom.
Phase 4.
Third Year:
Finish off even later with new lighting, awnings on upper story windows, and a new entrance. Also, improve the rear entrance for customers.
F.
EVALUATE FACADE CONDITION.
Now that you have determined an overall approach, how do you proceed with developing a design? Here are some basic principles of good storefront design:
1.
KEEP IT SIMPLE.
An individual storefront should have a simple, unified design that serves as a frame for the windows that display goods or reveal services offered inside. If the design and its colors are too "wild," they will detract from merchandising, and if they are too plain, they will not draw enough attention. You must establish a balance that is visually pleasing. The guidelines that follow will help you find that balance.
Your building should be a good neighbor.
2.
RELATE TO OTHERS IN THE BLOCK.
There is strength in numbers. As more and more buildings are renovated, they will improve the overall image of downtown as a pleasant place to do business. This is especially true when similar design concepts are applied throughout downtown because a sense of visual continuity results. You can help contribute to the visual continuity of downtown while also developing a design that meets your own needs. These guidelines give general principles that allow room for individual solutions, but at the same time, if each owner applies them to their buildings, the overall image will appear coordinated.
3.
USE THE ENTIRE BUILDING FRONT AS YOUR IMAGE.
Coordinate upper and lower floors into a single design concept, even if the upper floors are not a part of the ground floor business. This can serve the "attention-getting" function and can be much more effective than a large sign.
4.
DEVELOP A CLEAR PRESENTATION TO THE STREET.
A single, clear design concept that avoids clutter and forcefully directs the customers eye where you want it is important. Your design scheme should easily lead the viewer's attention to displays of goods. views of activities inside, and ultimately to the business entrance. Use only a few colors throughout and keep signs to a minimum. Place them where they will lead the customer's eye to products or activities.
5.
RESPECT THE HISTORIC INTEGRITY OF THE BUILDING.
Most of the structures downtown have historic value, even many of those that have experienced some later alterations. It is important to consider the significance of basic forms, materials and details when planning improvements. Preservation of Globe's heritage is important to its sense of community and its economic development.
6.
HOW TO DETERMINE FACADE CONDITION.
Determine how much of the original front exists and evaluate its contribution to the history of downtown or to the overall business image of the area and then choose your approach from those listed in Step 2 of Chapter 1, Subsection E—Project Planning.
7.
ORIGINAL DESIGN INTACT.
Buildings in this category have changed very little from the time they were constructed. Original ornament and details, if a part of the design, are still intact. Some portions of the facade may require maintenance and repair, but no new design changes are necessary. In these cases, preservation of the original design is your preferred option.
8.
ORIGINAL DESIGN SLIGHTLY ALTERED.
If you can still see the basic character of the original design, but some elements have been removed or changed, then your building falls into this category.
For example, an ornamental cornice may have existed at the top of the wall, but it is now missing, or upper story windows may now be blocked with plywood panels. The original character is diminished, but it is retrievable.
If you are able to find early photographs or original architectural drawings, it may be easier to determine how many changes have been made. Restoration of the original design is one option in this case; another choice is to restore some details while adding some new elements that are compatible with the original. For example, you might reconstruct the missing cornice, but at the same time build a new shop entrance that is not a copy of the original, but which uses the typical elements usually found on buildings downtown.
9.
FACADE CONDITION (ORIGINAL DESIGN SIGNIFICANTLY ALTERED).
These buildings have plain fronts that are without any ornamentation or details. This may be a result of coverings that hide original designs, or because the facades were stripped of all detail. The coverings or sheathing may have to be removed to reveal the original facade. For such situations, the guidelines encourage reconstruction of the original designs, or the development of entirely new designs that are compatible with the older buildings.
10.
NEWER PLAIN FRONT BUILDINGS.
Newer buildings often were designed as simple "contemporary" designs. As a result, the facades are featureless and they usually fail to relate well to the more historic buildings in the area.
11.
AUTO-ORIENTED BUILDINGS.
Some newer buildings downtown are set back from the street, with space in front for parking. These buildings are intended to relate to cars more than pedestrians. Providing landscaping that enhances the site for pedestrians should be the approach for these properties.
CHAPTER 2
SPECIAL DESIGN GUIDELINES FOR HISTORIC BUILDINGS
A.
BUILDING STYLE.
SPECIAL IDEAS FOR HISTORIC BUILDINGS.
If your building is one of those designated as contributing to the historic district, then you own a special asset that merits additional attention. Preservation of character-defining elements of historic buildings should be a top priority, and alterations and repairs should accurately represent the historic qualities of the buildings. Original documentation therefore should be used for restoration work whenever possible. Look for early photographs that will help give clues about the original design. Where original documentation is not available, interpretations of similar elements that occurred in the area may be considered.
In order to determine if your building is designated as "contributing" to the historic district refer to the map on file with the Historic Globe Main Street Program.
HERE ARE SOME BASIC PRESERVATION TIPS:
B.
CHANGES IN USE.
H1.
Respect the original design character of the building.
Analyze the building to determine which elements are essential to its character. Don't try to make it appear older (or younger) in style than it really is. The genuine heritage of the district should be expressed. Avoid these designs, such as "Swiss Village" or "Old West".
H2.
New uses that require the least change to existing structures are encouraged.
Every reasonable effort should be made to provide a compatible use for the building that will require minimal alteration to the building and its site.
C.
REPAIRING AND/OR REPLACING ORIGINAL FEATURES.
H3.
Avoid removing or altering any historic material or significant architectural features.
Original materials and details that contribute to the historic significance of the structure are qualities that should be preserved whenever feasible. Rehabilitation work should not destroy the distinguishing character of the property or its environment. Examples of historically significant architectural features are porches, window trim and chimneys. Other significant elements may be the overall building form, its roof shape or material finish.
H4.
Maintain existing significant stylistic elements.
Protect historic material with maintenance treatments such as rust removal, caulking, and repainting.
H5.
Use the gentlest procedures for cleaning, refinishing, and repairing historic materials.
Sandblasting is especially damaging! See Chapter 8, Maintenance Tips.
H6.
Minimize the removal of historic elements.
Deteriorated architectural features should be repaired rather than replaced, wherever possible. Patch, piece-in, splice, consolidate, or otherwise upgrade the original material, whenever possible.
The original materials used to construct your building are evidence of earlier craftsmanship and technology, which provides useful information to historians.
H7.
Replace only missing portions of original elements where economically and physically feasible.
It is recommended not to throw out an entire window frame, for example, if only the sill is rotted. Match the original material when patching with new material. A substitute material is acceptable if the form and design of the substitute conveys the visual appearance of the original. For example, a synthetic material may substitute for a plaster molding.
H8.
When disassembly of an historic element is necessary for its rehabilitation, use methods that minimize damage to the original materials.
Sometimes trim elements and other materials must be removed in order to repair or refinish them. Always devise methods of replacing the disassembled materials in their original configuration. Code trim pieces, for example, so you can replace them accurately.
If you are considering applying for Federal income tax credits for the certified rehabilitation of historic buildings, do not attempt removal of any materials until you have consulted with the Historic Globe Main Street Program, the City's Historic Preservation Advisory Commission and the State Historic Preservation Office.
H9.
Replacement of missing architectural elements should be based on accurate duplications of original features where feasible.
In some cases, an entire detail must be reconstructed. In the event replacement is necessary, the new material should match the original in design, color, texture, and other visual qualities.
The design should be substantiated by physical and/or pictorial evidence.
H10.
Where reconstruction of an element is impossible because of a lack of historical evidence, then a new design that relates to the building in general size, scale and material may be considered where feasible.
Use design elements that reflect the buildings style. A simplified interpretation of similar features on comparable buildings may be considered.
D.
EXISTING ALTERATIONS.
H11.
Preserve older alterations that have achieved historic significance in themselves.
Some changes to buildings are themselves evidence of the history of the building. These changes may have developed significance in their own right, and this should be recognized and respected. An example of such an alteration could be a 1910 storefront remodeling that was added to an 1890 structure. Although these early alterations did remove original character, most of them were sympathetic to the building.
This situation may be difficult to judge. Sometimes the original design is so important that removal of a significant change may be merited. Consult with the Historic Preservation Advisory Commission and the Historic Globe Main Street Program for advice on this issue.
H12.
More recent alterations that are not historically significant may be removed.
This removal may in fact reveal original design features. You may wish to photograph the process to document it for future reference if others wish to research the building's history.
CHAPTER 3
REHABILITATION GUIDELINES FOR ALL EXISTING BUILDINGS
The rehab guidelines should be useful for most commercial buildings that are found in downtown Globe, both those that are considered "historic" and also those that are not.
A.
TYPICAL BUILDING FRONT FEATURES.
Which of these typical building features can you find on your building?
1.
The facade has ornament and detail that provides interest to pedestrians.
2.
The first floor level has a large area of display windows which allow pedestrians to see goods and activities inside.
3.
The front of the store is aligned at the sidewalk edge helping to define the pedestrian zone.
4.
Signs are sized and positioned to be read at eye level by pedestrians.
5.
The second story, if it exists, is more solid than the first; with smaller windows.
6.
Brick and stucco are the dominant building materials, although stone, metal and even wood can be found.
7.
The main store entrance is recessed in a notch.
8.
The top of the building is usually capped with a decorative parapet or cornice.
9.
The first floor display windows also are usually capped with a belt cornice or molding as well.
If you develop a rehabilitation scheme that respects and even enhances these basic building characteristics, it will usually be the most cost-effective and the most pleasing visually. For more specific design ideas, proceed to the section on guidelines for general rehabilitation.
B.
STOREFRONT OPENINGS.
R1.
Maintain the original size and shape of the storefront opening.
Preserve the large panes of glass that were a part of the original storefront opening if possible. These transparent surfaces allow pedestrians to see goods and activities inside. If the storefront windows have been reduced in size over the years, consider re-establishing their original dimensions. Be certain that the glass fits within original piers or columns that may exist. These are also essential parts of the design character that add interest and should not be obscured. If keeping a large glass area is not feasible for your operation, develop the wall in a manner that will provide interest to pedestrians in some other fashion, such as with a decorative mural or wall sculpture, or even display cases. The important principle is to provide surfaces that encourage walking and browsing in the downtown. Opaque materials, such as black Plexiglas, are not appropriate in the place of display windows, because they do not provide pedestrian interest. Reflective, mirror glass is also inappropriate. This hides indoor activities and creates glare on the sidewalk.
C.
FACADE ALIGNMENT.
R2.
Maintain the storefront wall at the sidewalk edge.
Pedestrians downtown are accustomed to having the inside edge of the sidewalk clearly defined by a wall of storefronts, all presenting interesting activities and merchandise to the street. This characteristic is an essential element of healthy downtown retailing.
Preserve the glass at the sidewalk line where feasible, to define the pedestrian zone. This is especially true if the building has historic significance, because the original glass, frame, and columns may be intact.
Most original storefronts were parallel to the sidewalk, but in later years an "angled" display window was sometimes installed in remodeling. Consider re-constructing the original configuration in these cases. If realignment is not feasible, focus on improving the visibility and quality of the entry (see the next design ideas).
D.
ENTRANCES.
Recessed entries help invite customers inside and they provide temporary shelter in inclement weather.
R3.
Maintain recessed entries where they exist.
These areas provide protection from the weather, and the repeated rhythm of these shaded areas along the street helps to identify business entrances.
Avoid doors that are flush with the sidewalk. If the original recessed entry has been removed, consider establishing a new one. Use doors with large areas of glass where feasible; these will improve the visibility of your business to viewers outside. Consider using an accent color on the door. This will help to lead the customers inside. As a way of highlighting the entrance for customers, center your sign over the door. (Refer to the sign design ideas on page 24.)
E.
KICKPLATES.
A kickplate, or bulkhead, usually supports the floor of a display window. These typically align along the street, adding to the visual continuity of downtown.
R4.
Maintain the kickplate that is found below the display window.
If the kickplate is missing, one option is to reconstruct the original using old photographs as a guide. This provides for a decorative color scheme. Coordinate the color scheme of the kickplate with other facade elements. If original design information is not available, another option is to design a new, simplified kickplate. Appropriate materials may include painted wood, glazed tile, or painted metal.
F.
DOORS.
The entry of a building is an important architectural element. The size and shape of the doorway is as essential as the door design itself
R5.
Use door styles that are found on traditional storefronts.
The original doorway should be preserved on all historic buildings. The door and doorway symmetry rely on each other to work as a balanced building element.
•
On different buildings different door styles are appropriate.
•
Residential doors are never appropriate in the downtown area.
•
Doors that have small or no visibility into a store should be avoided.
•
Door openings should not be blocked off or otherwise altered in shape.
Doors with metal frames and large areas of glass are particularly appropriate on Art Deco and Moderne style buildings.
G.
TRANSOMS.
The upper glass band of traditional storefronts introduced light into the depths of the building, saving on lighting costs.
R6.
Preserve the transom if it exists.
These bands of glass are found on many buildings and they often align at the same height in a block. Maintaining this line will help to reinforce a sense of visual continuity for the street.
When transoms are covered and original moldings and window frame proportions are concealed, the impact of the storefront is weakened. Use glass in the transom if possible. The purpose is to maintain the alignment of your storefront with others in the block. Glass is preferred, because it introduces light into the interior of your store. As an alternative, use the space as a sign or decorative panel. Keep the background a dark color, similar to the way glass is perceived. Always retain the original shape and proportions of the opening. If the interior ceiling is now lower than this glass line, pull the dropped ceiling back from the window on the inside to maintain its historical dimensions.
Some transoms have hinged panels to allow natural ventilation. Restore these to working order where feasible. Used in combination with ceiling fans to re-circulate air that collects at the top of the room, these operable transoms can be very effective in improving comfort levels, especially during "swing seasons," when full air conditioning is not as necessary. In some cases, air conditioning units may have been mounted in the place of one of the transom panels, usually just over the entry. These units blast hot air onto approaching customers and raise the temperature of the sidewalk. They also detract from the design character of the building. Relocate these units to the rear, or install roof-top systems where feasible.
H.
UPPER WINDOWS.
Glass areas in upper stories are traditionally much smaller that first floors. This ratio of solid to void is very important.
R7.
Preserve the size and shape of upper story windows.
Typical upper windows are vertically oriented and usually several are uniformly spaced along the building front. This rhythm of upper story windows is a very important unifying feature of downtown, because it is repeated on most buildings.
Consider re-opening the windows if they are presently blocked. Window manufacturers now offer replacement windows that will fit the original opening; others will provide custom ordered windows to fit exactly. Do not block down the opening to accommodate a stock window that does not fit the building.
Window shades or curtains, in colors that coordinate with other accent trim, are encouraged. In the process of cleaning up windows, remove old stored items from view; these often detract from the image of downtown as an active place to do business. If lower ceilings upstairs are necessary, pull the ceiling back from the window to maintain the original height at the window.
If your budget cannot include reopening the windows, consider using shutters to define the original window dimensions. These will still keep birds and weather out, but give a more "occupied" appearance.
Where upper story windows can be maintained, consider using curtains that repeat colors used on the first floor awnings or trim. This is especially useful where upper floors are vacant. In this way, the second story can reinforce the color scheme of the business below. Another option is to consider using awnings on upper story windows that match those on the first floor in style and color.
I.
AWNINGS.
R8.
Consider using fabric awnings to provide weather protection and create interest.
Awnings are particularly useful on buildings that are quite simple. They provide shade from the strong Arizona sun for merchandise, shelter for pedestrians, reduce interior heat and bring a colorful accent to the building front that can be changed frequently without great expense.
The awning should fit the dimensions of the storefront opening to emphasize these proportions. It should not obscure ornamental details. Mount the top edge to align with the top of the transom, or to align with the framing that separates the transom from the main display window. This will help strengthen the visual continuity of storefronts.
Coordinate the color of the awning with the color scheme for the entire building. Appropriate fabric awnings are encouraged, and shiny vinyl or plastic awnings are discouraged. They may be fixed or operable. Fixed awnings will wear longer, but operable ones have the flexibility of being changed with weather and light conditions. Awnings will wear, and should be acknowledged as an operating cost of doing business, which can be changed every few years for a fresh look.
On some buildings, horizontal metal canopies may be appropriate, where there is historic precedence for their being used on similar buildings. Consider painting the edge of the canopy with a color that matches other trim on your building. This will help tie it into the overall composition. As a compromise with installing a fabric awning, consider trimming the edge of the canopy with fabric. Metal awnings should be avoided except where they contribute to the historic character of the building.
Rough-sawn wood, plastic, shake or asphalt shingles are not appropriate materials for canopies. Fake mansard roofs are also inappropriate. These do not reflect the character of downtown, and they do not provide an opportunity to add an accent color to the building.
Installing lighting in awnings so they effectively act as an internally lit sign is inappropriate. These tend to overpower the building front at night, detracting from display windows rather than drawing attention to interesting building interiors.
J.
ORNAMENTAL DETAILS.
Decorative features can add a distinct image to your business. Even as a tenant, customers may recognize your location because of these features.
R9.
Preserve the original ornament and detail of the facade.
Architectural details add interest to downtown, and are a part of the unique identity of your building. Parapets, cornices and window arches are examples of decorative elements found on many buildings in downtown Globe.
Where portions of these details have been removed, refer to photographic evidence of the earlier condition, and look for details that may have been removed and restored to use as patterns for new designs. Where exact reconstruction of details is not feasible, consider developing a simplified interpretation of the original, in which its major form and line is retained.
Ornamental details on earlier buildings were typically metal or masonry. Wood or molded synthetic substitutes may be considered as replacement. Ornamental caps or cornices at the top of the facade are especially encouraged, because they give a "finished" look to the building. When these cornices are repeated along the street, they create an important line that should be reinforced at every opportunity. Consider highlighting details with accent colors or lighting.
K.
FACADE MATERIALS.
R10.
Avoid concealing original facade materials.
Brick, stone and stucco are historically dominant materials downtown. In most cases, exposing the underlying material will help to re-establish the character of the building.
If the original material has been covered, uncover it if feasible. The original material is often the most durable surface, and if it is masonry, the texture of the wall will contribute to the visual continuity of the block. Metal cladding often is easy to remove, and only small areas of the underlying material will have been damaged. When a building front is entirely covered, it often breaks the rhythm of upper story windows that contributes to the visual continuity of the street. Cover-ups also hide interesting details that enhance the identity of business located in the building.
If, after removing the covering material, you discover that portions of the original must be replaced, use a material that is similar to the original in color and texture. Highly reflective materials are discouraged, because they create glare, increase the temperature of the sidewalk area in summer time, and block views of interesting activity inside buildings, thereby discouraging pedestrian activity downtown.
Rough-sawn wood is also inappropriate. Unpainted wood ages quickly and collects dirt. Wood should always have a weather-protective finish. Paint is preferred, in a color that coordinates several trim and ornamental features.
Covering materials usually weakens the design character of the building and may even obscure deterioration that is occurring to the structure. Working with the original facade materials is usually the most cost-effective approach.
R11.
Leave brick unpainted if it was historically unpainted.
This is especially true for historic buildings. Keep in mind, however, that painting of brick is a long established tradition, and a well-painted front can be a very good design solution. If the brick is already painted, avoid paint removal schemes that damage the finish with abrasive methods. (Sandblasting, for example, will damage the finish and accelerate erosion.) Consider re-painting the brick rather than stripping down to bare brick. This means that you will need to re-paint periodically, but that is a fact of good building maintenance. Re-painting may also be necessary if you have to patch holes in the brick wall and are not able to accurately match the original in color and mortar profile. A muted background color will work best, allowing you to use brighter colors for accents.
If the building is already sand blasted, then you should prepare for the added maintenance that this may cause. The roughened surface will become dirty quickly, and moisture may enter the wall. Water-protective sealant are generally considered to be ineffective in these situations. Painting the brick may provide some relief, but note that re-painting in a regular maintenance schedule may require more effort to prepare a sound substrate because of the irregular surfaces. See the Historic preservation Commission for additional information.
L.
ROOFS.
R12.
Preserve original roof forms.
Avoid concealing the original roof line. New panels or covering materials that obscure this line are generally discouraged. In the process of removing a metal panel covering, you may discover an interesting parapet design as a special reward.
Fake mansard and shed roofs are inappropriate, because they are out of character with the original facade designs.
M.
ADDITIONS.
All buildings should be recognized as products of their own time. New additions that create an appearance inconsistent with the historic character of the building should be discouraged. Contemporary styles for new buildings in old neighborhoods and additions to existing buildings should be encouraged when such designs are compatible with the size, scale, color, material, and character of the neighborhood, the building, or its environment.
R13.
Avoid new additions or alterations that would hinder the ability to interpret the design character of the original building.
•
Alterations that seek to imply an earlier period than that of the building are inappropriate.
•
Alterations that seek to imply an inaccurate variation on the historic style are also inappropriate.
Whenever possible, new additions or alterations to buildings should not obscure or confuse the essential form and character of the original building.
R14.
Where new additions are planned that have no historic basis, design them to be as inconspicuous as possible.
•
Set such additions back from the primary facade.
•
Additions include porches and upper floors as well as entire wings.
Additions should be positioned so they do not negatively impose significant facades of features.
R15.
When locating additions to historic buildings, maintain the pattern created by the repetition of similar building fronts.
•
Site additions back from the building front so they will not alter the historic rhythm of building forms.
N.
"PLAIN FRONT" BUILDINGS.
Some buildings in the downtown area do not have historic features or even modern ornamentation. Many were built as simple fronts, others are actually cover-ups on older buildings. If your building seems "plain," consider these options:
R16.
Whenever feasible, uncover original facade materials.
These materials are often more durable, and more interesting than later coverings. They may also provide an overall design idea for other building elements. If, however, the building really has no details, it may have been built that way.
In other situations, there is no "earlier" front to expose.
R17.
If uncovering is not feasible, develop a new design that will reinforce general characteristics of other buildings on the block.
Develop a new design, using the traditional storefront elements described on pages 14 through 19, or develop a simple design using these three basic elements; a unified paint scheme, an awning and a sign.
R18.
Emphasize horizontal features that can align with other buildings. Consider highlighting a simple cornice, a band of color, a sign panel or an awning edge that can line-up with similar elements on the street.
In some cases building fronts with Moderne or Art Deco styles may be interpreted as "plain fronts" and can benefit from highlighting horizontal banding as well.
O.
REAR ENTRANCES.
Back entrances have become more important for public use as off-street parking lots are developed behind buildings. Also consider how your image can be improved here as well, while also remembering that service functions also must be accommodated.
R19.
Develop the rear entrance for both public and service access where feasible.
Use materials and colors that coordinate with the main facade, so customers will learn to recognize both entrances are related to the same business.
Use a smaller version of the front sign to identify this entrance. Provide lighting at the rear entrance that is similar to the lighting in the front. All areas should be lit, even back alley ways. The lights should be pedestrian oriented in location and height.
Developing a rear entrance for public use may also require reorganizing your interior store layout.
R20.
Screen service equipment and trash containers.
Use solid wood or masonry partitions, lattice screens, or consider hedges to screen trash areas. This will make the entrance more attractive to customers. Keep electrical service boxes and conduits in good repair and painted.
Consider using a color scheme on these screens that matches that on your building. It may also be possible to consolidate trash containers from several buildings in a central area.
P.
ILLUMINATION.
Buildings should be interesting at night as well as by day, for pedestrians and motorists. Even when a business is closed, a well-lit storefront creates a positive impression about downtown, and people are encouraged to return during business hours.
R21.
Use lighting to unify the building composition at night.
Use lighting as a design element to draw attention to the entire building, not just the sign. Coordinate lighting of these four elements: window displays, entrances, signs and building details. The display window lighting should remain the dominant element. Don't overpower this with extensive lighting on other facade elements.
R22.
Balance the color and intensity of lighting among building features.
Sign lighting should be balanced in color and intensity with light in display windows. Warm-colored light is preferred for all exterior lighting, since this is more pleasing to the eye, and will more easily draw attention to window displays. Avoid blue fluorescent light. Fixtures should be concealed, a very simple design, or a style that is appropriate to the period of the building. Indirect lighting from down lighting makes a good impression and complements building products and colors.
CHAPTER 4
SIGNS
NOTE: The design standards for signs presented in this chapter are recommended as special supplements to the City of Globe Sign Code for the Historic District only. Before beginning a sign project, check with City Hall to confirm that current ordinances allow the design ideas presented here.
A.
BUILDINGS AS SIGNS.
S1.
Consider your building front as part of the sign.
A sign serves three functions: First, to provide an index to the environment; second, to attract attention, and third, to convey information. If the building front is nicely renovated, it can serve the attention-getting function, allowing the sign to be focused on conveying information in a well-conceived manner which is appropriate to the building's environment.
In some cases an historic painted sign survives on the side wall of a corner building. Preservation of these accents is encouraged.
B.
SIGN TYPES.
S2.
These types of signs may be considered:
•
Flush-mounted signs (usually mounted flat to the wall, just above the display windows).
•
Short and relatively small free-standing signs (A-frame signs geared toward pedestrian traffic).
•
Projecting signs (near the business entrance, near eye level).
•
Window signs (painted on or hung just inside).
•
Awning signs (often including a symbol).
•
Product display signs in windows (lively, and changing).
•
Neon signs may be appropriate on some styles. Positioning neon inside the storefront glass is preferred.
•
Three dimensional signs for products or themes.
C.
INAPPROPRIATE SIGNS.
S3.
These signs are inappropriate downtown:
•
Tall freestanding signs.
•
Flashing signs.
•
Signs that visually overpower the building.
•
Can signs (interior lit cabinet signs).
•
Awnings of inappropriate size or style.
•
Signs above the second story sill level or above the roof or cornice line.
D.
SIGN LOCATION.
S4.
Position flush-mounted signs so they will fit within architectural features.
These should help reinforce horizontal lines along the street. Coordinate the color scheme with the building front. Locate flush signs so they do not extend beyond the outer edges of the building front.
Look to see if decorative moldings define a "sign panel" for flush-mounted signs.
Coordinate sign colors with those of awnings and window shades.
S5.
Locate projecting signs along the first floor level of the facade, not above.
Place signs near the business entrance, to guide your customer's eyes to the door. Use symbols in projecting signs. These are more easily identified and remembered. They also add interest to the building.
S6.
Where several businesses share a building entrance, coordinate the signs.
Align several smaller signs, or group them onto a single panel or backgrounds for the signs, to tie them together visually and make them easier to read.
S7.
Mount signs so they will not obscure any architectural details.
Note that you must have a permit for signs in the downtown area. Check with City Hall before ordering any new signs or repairing existing ones. When mounting or attaching a sign to a historic building, one should, if possible, attach it with fasteners into the mortar between the bricks or masonry, rather than directly into the brick or block.
S8.
Locate freestanding signs in landscaped areas or immediately adjacent to the building.
Keep them low in scale so they relate visually to the building. Free-standing signs (such as sandwich boards) should not obstruct pedestrian traffic on sidewalks.
E.
SIGN MATERIAL.
S9.
Sign materials should be compatible with the facade materials.
Painted wood and metal are encouraged as sign materials because they relate well to the buildings. Use plastic only in limited amounts. Avoid highly-reflective materials that will be difficult to read.
S10.
Select high quality sign materials.
Good craftsmanship will pay off in longer service for your sign, and it will convey a stronger image to the public. Select high quality materials: Signs are exposed to extreme weather conditions, and a deteriorating sign presents a poor image to customers.
Use a "custom" design that portrays your business as being unique. Mass-produced signs, especially rectangular plastic panel ones with internal lighting, fail to make a lasting impression.
F.
SIGN ILLUMINATION.
S11.
Indirect light sources are best for signs.
These focus light on the sign and the objects that are on display in a similar manner, so the viewer's eye moves comfortably between the two elements. Glare is also minimized.
S12.
Illuminate signs in such a way as to enhance the overall composition of the facade.
S13.
No more than a total of five percent of the building facade area (length × height = building facade area) is appropriate for signs. Add all signs including window lettering into the five percent total.
CHAPTER 5
DESIGN GUIDELINES FOR COLOR
A.
RELATING TO ADJACENT COLOR SCHEMES.
Use color to your advantage. Some of the most noticeable results are achieved with a fresh paint job. The most effective and economical schemes often start with the natural colors of the building materials themselves as a base.
C1.
Use color schemes that will complement other buildings nearby.
Look to see if colors used by others in the block may be incorporated in your scheme. This will help to tie in with others in the block. Mix and match colors from several nearby buildings in your color scheme; don't simply copy one building entirely. The natural colors of brick and stone should dominate on the street.
You may wish to research the historic color scheme of your building. The State Historic Preservation Office or the Historic Globe Main Street Program has information available on procedures for [color] investigation.
B.
COORDINATING THE ENTIRE FACADE.
C2.
Use color to coordinate facade elements in an overall composition.
Use only one base color for the majority of the background watt surface. Base colors should be muted earth tones or pastels. Look for "built-in" features of the facade that can be highlighted with an accent color.
Window frames, sills, moldings and cornices are potential elements to dramatize with a contrasting color.
C.
USING ACCENT COLORS.
C3.
Reserve bright colors for accents and where evidence demonstrates the historical use of bright colors.
Consider accent colors for signs, awnings, and entrance doors.
Earth tones will hold their color well, as will darker pastels. Check for color stability in ultra-violet light; some colors, such as red, tend to be unstable and will shift in hue over time.
CHAPTER 6
DESIGN GUIDELINES FOR NEW BUILDINGS
A.
BUILDING ORIENTATION.
In general, new buildings should be harmonious in form, material, siting and scale with the established district character.
N1.
Align the facade of the new building with the established setbacks of the area.
Building fronts typically align at the sidewalk downtown. This distinguishes the area from suburban auto-oriented businesses and helps provide a friendlier pedestrian-oriented environment for shopping.
B.
BUILDING FORM AND SCALE.
N2.
New buildings should appear similar in mass and scale with historic structures in the area.
Where new building facades will be wider than those found traditionally, subdivide the surface into portions similar in scale to historic facades by varying set-backs, roof forms, and materials.
Building heights should be within the range of buildings traditionally built downtown. In general, these are two to four stories in height. Maximum building height is 60 feet.
N3.
Use building forms that match those used traditionally.
Simple rectangular forms are preferred.
N4.
Use roof forms that match those used historically.
Flat roofs or simple gables are typical. Stepped parapet false fronts are also appropriate.
C.
MATERIALS.
N5.
Use building materials that are similar to those employed historically for all major surfaces.
Materials should be similar in appearance to those used historically. New materials may be used if their appearances are similar to those of the historic building materials such as brick and native stone. Use finishes similar to historic buildings in the district.
•
Brick and stone are appropriate materials for large surfaces on buildings, stucco may also be considered.
D.
ENTRANCES AND WINDOWS.
N6.
Orient the main entrance of the building to the street.
N7.
Use window sizes and proportions similar to those found traditionally in the district.
E.
PORCHES, AWNINGS AND BALCONIES.
N8.
Respect porches, awnings and balconies.
Historically, Globe had several buildings with such elements as porches, awnings, and balconies. These elements may be considered in new construction, where detail elements should complement details of surrounding historic buildings. When mounting or attaching an awning to an historic building, one should, if possible, attach it with fasteners into the mortar between the bricks or masonry, rather than directly into the brick or block.
N9.
Be aware of floodplain regulations.
In cases where FEMA (floodplain) regulations conflict with these design guidelines, FEMA regulations take precedence. Every effort should be taken to accommodate these guidelines in meeting FEMA rules.
CHAPTER 7
SITE DESIGN GUIDELINES
These design ideas apply to new buildings especially, although they also are useful in rehabilitation projects.
A.
BUILDING SETBACKS.
SD1.
Maintain the alignment of the buildings at the sidewalk edge.
Exceptions are residential buildings, where front yard setbacks are generally appropriate.
Where buildings are set back from the street and parking is sited in front, provide landscaping along the sidewalk edge to buffer the pedestrian zone.
Where buildings must be set back from the street, provide a landscape buffer to define the property line.
B.
PLANT BEDS AND PLANTINGS.
SD2.
Locate plantings in traditional areas of the site.
Provide a buffer edge to parking lots. For residential buildings that are now in commercial use, plantings along fences, walks, foundations, and at porch edges are good location.
•
Courtyards are encouraged.
•
Metal fences are appropriate.
•
Chain link fences are inappropriate.
•
Use indigenous, drought-tolerant plant materials where feasible.
•
Refer to the landscaping requirements in the City of Globe Planning and Zoning Code.
C.
PARKING LOTS AND LANDSCAPING.
SD3.
Plan parking lots so that the visual impact of large paved areas is reduced.
Provide planting buffers at appropriate edges of parking lots. Or use decorative paving to define the site border. Also include islands of planting in the interior of large lots. Side or rear locations are preferred for parking lots. Use drought tolerant plant materials to reduce water consumption. As an alternative to planting areas, consider also using decorative paving, planters and other street furniture to create visual interest.
D.
SERVICE AREAS AND EQUIPMENT.
SD4.
Screen service equipment and trash containers from public view.
The visual impact of mechanical and electrical equipment should be minimized. Use colors and materials for trash screens that relate to the building designs.
CHAPTER 8
MAINTENANCE TIPS
In addition to the design improvements that you plan, also include these basic maintenance tasks which can preserve and enhance your historic building.
A.
UPPER STORY WINDOWS.
1.
Re-glaze loose glass in historic building windows. This will reduce air leaks and make the building more energy efficient and comfortable.
2.
Install weather stripping in older buildings. This will enhance energy conservation significantly!
B.
STOREFRONTS.
1.
Repair damaged kickplates on historic buildings.
2.
Re-caulk display windows to reduce air infiltration.
3.
Install weather stripping around doors, especially in older buildings.
C.
ROOFS.
1.
Clear debris from gutters and down spouts, to prevent their backing up and causing water damage to historic buildings.
2.
Patch leaks in the roof. This should be a high priority.
3.
Re-point eroded mortar in the parapet wall. Use an appropriate mortar mix.
4.
Re-solder down spout connections, to prevent water leaking out onto walls.
5.
Connect down spouts into underground sewers. Don't allow water to run out at the foundation of the building.
D.
AWNINGS AND CANOPIES.
1.
Repair leaking down spouts for metal canopies, especially if they are historic.
2.
Replace worn fabric awnings on historic buildings.
E.
SIGNS.
1.
Re-secure sign mounts to the building front, while protecting historic building materials.
2.
Repaint faded graphics.
3.
Remove obsolete signs.
4.
Preserve historic painted signs in place.
F.
ENERGY CONSERVATION FOR HISTORIC BUILDINGS.
It's a myth that thermal glass will make a substantial impact. Generally, the problem is that older glass has dried and shrunken glazing compound around it, which allows air to leak around the glass. The best strategy is to re-glaze existing glass. Upstairs, you may also consider installing storm windows. Be certain that the frame styles of the storm windows match those of the original windows. Follow these steps:
1.
Re-glaze all loose glass.
2.
Weather strip doors and windows.
3.
Install destratification fans to circulate air.
4.
Install insulation in the attic.
5.
Consider installing insulation in the crawl space or basement.
You may also wish to consider using insulated shutters on upper story windows in winter time. This is especially effective where the space is now used for storage. The shutter surface also provides a space for an additional color accent.
G.
TECHNICAL ISSUES.
There are also some technical maintenance and repair standards that you should follow in order to protect the materials of your building and to preserve its historic integrity. The Historic Globe Main Street Program has detailed information about the following procedures:
•
Re-pointing eroded mortar in existing brick walls. Most older brick is very soft and will not withstand the effects of modern mortars, such as Portland cement. It is very important to use a special mix that resembles the original mortar recipe and style.
•
Cleaning historic brick walls. Because older bricks are soft, they will not withstand abrasive cleaning methods, such as sand blasting. This will expose the interior of the brick to water and accelerate erosion. Use gentle cleaning methods only.
•
Sealing brick walls. In cases where brick has already been sand blasted, some people attempt to retard deterioration by applying clear sealant to the abraded surface. These usually do not work and are a waste of money.
•
Patching historic metal details. Mixing different metals can cause an electrolytic reaction and actually cause deterioration of metal. When patching old cornices, etc., be cautious.
•
Graffiti removal. (To be added.)
CHAPTER 9
APPENDIX
A.
GLOSSARY OF ARCHITECTURAL TERMS.
BALUSTRADE: A railing or low wall consisting of a handrail on balusters (small supporting posts) and a base rail.
BASE: The lowest part of a building; the lowest part of a column.
CAP: The top member of a column or pilaster.
CHARACTER-DEFINING: A distinctive architectural feature or combination of features or qualities that distinguish one building from another.
CLERESTORY: An upper zone of wall pierced with windows that admit light into a large room.
CONTEXT: The surrounding environment of a building or site, including other structures, site features, landscape and streets.
COPING: A capping to a wall or parapet.
CORBEL: A bracket of stone, wood, or metal projecting from the side of a wall and serving to support a cornice, the spring of an arch, a balustrade or other element.
CORNICE: A projecting ornamental molding along the top of a building crowning it.
DORMER: A window set upright in a sloping roof; the roofed projection in which this window is set.
ELEVATION: A "head-on" drawing of a building facade or object, without any allowance for perspective. An elevation drawing will be in a fixed proportion to the measurement on the actual building.
FACADE: A face of a building, usually the front.
FASCIA: A horizontal band of vertical face trim.
FEASIBLE: Capable of being done or carried out, both economically and physically.
FREESTANDING SIGN: A detached sign which is supported by one or more columns, uprights or braces extended from the ground or from an object on the ground, or a detached sign which is erected on the ground.
GABLE: The triangular wall enclosed by the sloping ends of a ridged roof.
HOOD MOLDING: A projecting molding around the top of a doorway or window to throw off the rain.
INDIRECT LIGHTING: Light only from a concealed light source outside the sign face which reflects from the sign face.
INTERNAL ILLUMINATION: A light from a source concealed or contained within the sign, and which becomes visible through a translucent surface.
KICKPLATE: A solid panel beneath a storefront display window.
LANDMARK: A prominent building or feature officially designated as having special status and protection.
LATTICE: An openwork screen or grill made of interlocking or overlapping strips.
LINTEL: A horizontal bar spanning an opening.
LUMINAIRE: A lighting unit; the housing for a light bulb, used for exterior lighting.
MOLDING: A shaped strip of wood, metal, brick, etc., usually mounted horizontally, and used as ornament on a surface of a structure.
MONUMENT SIGN: A free-standing sign, generally low to the ground with a continuous connection to the ground, as opposed to being supported on a pole.
MOTIF: An element in a composition, a principal repeated element in design.
PARAPET: Either the edge of the roof or the top of a wall which forms the top line of the building silhouette.
PRESERVE: To keep in perfect or unaltered condition. Preservation usually includes the overall form of the building, its structural system, and finishes, as well as any decorative details. Landscaping materials may also be preserved. Note that preservation of a structure may include keeping alterations and additions that become important.
RECONSTRUCT: To create again. A building, room or detail may be reproduced in its exact detail and appearance as it once existed. Accurate reconstruction requires good evidence of the original design. One approach to construction includes using the same construction methods as were used originally, whereas a second approach allows the use of substitute methods and materials, so long as they achieve the same visual effect as the original.
REHABILITATE: To return to useful life. Rehabilitation is the process of returning a property to a state of utility, through repair or alteration, which makes possible an efficient contemporary use while preserving those portions and features of the property which are significant to its historic architectural and cultural values.
REMODEL: To remake; to make over. In a remodeling, the appearance is changed by removing original detail and altering spaces. New materials and forms are installed. Applying a "modern" front to an older building is an example of remodeling. Often, these changes are not reversible.
RESTORE: To bring back to a previous condition. In a restoration an earlier appearance of the building is recreated, both in form and detail. Original elements that have been covered are exposed, and missing pieces replaced with new ones that match the original.
SHAFT: The main portion of a column, between the base and capital.
SILL: The horizontal bottom member of a window or door frame.
STABILIZE: To make resistant to change in condition. A building is usually stabilized to retard deterioration until it can be repaired. A weather resistant closure, and a safe structural system are minimum stabilization efforts.
STRING COURSE: A thin projecting horizontal strip of masonry on the facade of a building.
TERRA COTTA: A ceramic material molded decoratively and often glazed, used as a facing for buildings or as an inset ornament.
TRANSOM: A horizontal cross bar in a window, over a door or between a door and window above it. Also refers to a window above a door or other window built and often hinged to a transom.
(Res. No. 1313, 4-17-2000)